[Feedback][Tutorial Contents][hep.lcd Home]
![]()
These instructions assume that you have already successfully completed the first two tutorials in this series.
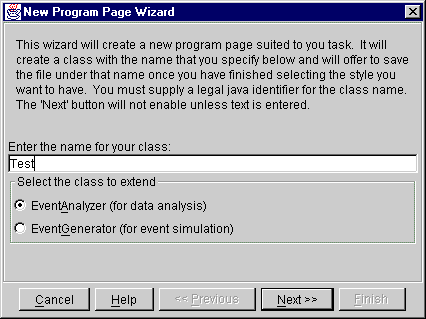
Start a new job and choose a dataset as before. Now from the File menu choose New..., Program Using Wizard. Type a name for your analysis routine, such as your initials followed by Test, e.g TJTest, and then choose all the default options by clicking Next, then Finish.
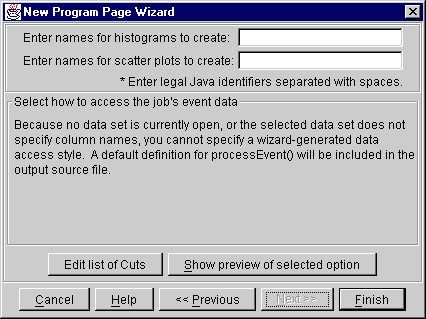
After you hit finish on the second page you will be prompted to save the file. Do so. Now you will have a blank analysis routine.
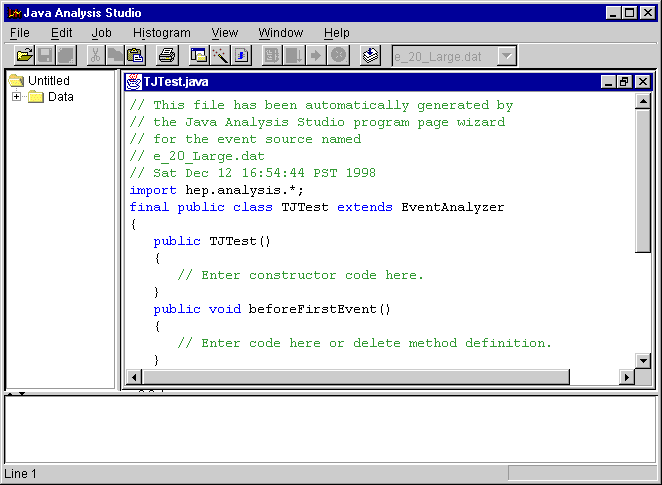
Replace the body of the processEvent method with the following code (you can copy this text from your browser and paste in into the Java Analysis Studio editor window). Don't worry too much about what this code means just yet, we will explain it in detail in the next tutorial.
   public void processEvent(EventData d)
   {
      LCDEvent header = (LCDEvent) d;

      CalorimeterHits hits = header.getEMCalorimeterHits();
      double EMEnergy = sumEnergy(hits.getHits());

      histogram("EM nhits").fill(hits.getNHits());
      histogram("EM Energy").fill(EMEnergy);

      hits = header.getHADCalorimeterHits();
      double HADEnergy = sumEnergy(hits.getHits());

      histogram("HAD nhits").fill(hits.getNHits());
      histogram("HAD Energy").fill(HADEnergy);

      hits = header.getMuonCalorimeterHits();
      histogram("MU nhits").fill(hits.getNHits());
      histogram("MU Energy").fill(sumEnergy(hits.getHits()));

      histogram("Total Energy").fill(EMEnergy/0.017 + HADEnergy/0.071);
   }
   private double sumEnergy(Enumeration e)
   {
      double energy = 0;
      while (e.hasMoreElements())
      {
         CalorimeterHit hit = (CalorimeterHit) e.nextElement();
         energy += hit.getEnergy();
      }
      return energy;
   }
In addition make sure the following import statements appear at the top of the program:
import hep.analysis.*;
import hep.lcd.event.*;
import java.util.*;
OK, now choose compile from the File menu. If all is well then a message should appear in the scrolling region below the text editor, saying "Compile successful". If all is not well the compilation error messages should appear in the same location and you will have to figure out what is wrong, and fix it, before compiling again.
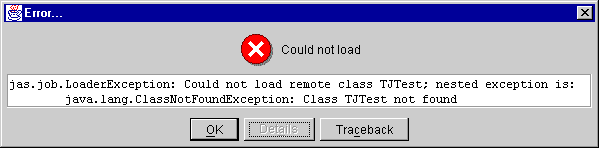
If the rountine compiles successfully then RIGHT click on the code window and choose Load. It is not unlikely that an error message will popup stating that the load failed:
To fix this you will need to ensure that Java Analysis Studio looks for loadable
classes in the directory where you saved your program file (the location is printed in the
scrolling region at the beginning of each compile in case you have forgotten where you
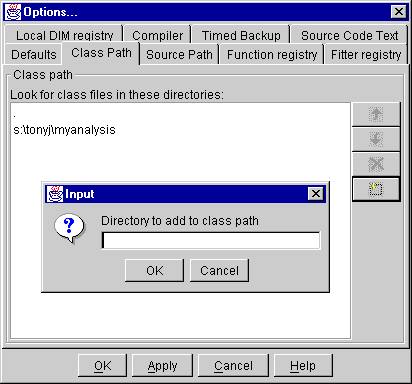
saved the file). To fix the load problem choose View, Options, then click on the Class
Path tab. Now click the new button (![]() ) and
type the full path to the directory that contains your file:
) and
type the full path to the directory that contains your file:
then click OK. Once you have dismissed the options dialog you can try loading your routine again, hopefully it will succeed now. Options set in the options dialog are remembered between invocations of Java Analysis Studio, so once you have set the class path appropriately you will not generally need to change it again.
Once your analysis routine is loaded you are ready to run your analysis. Choose Go from
the Job menu, or press the Go button (![]() ),
and your analysis job should begin. You will see the progress box in the bottom right
corner of the main window indicate how far the analysis has proceeded (
),
and your analysis job should begin. You will see the progress box in the bottom right
corner of the main window indicate how far the analysis has proceeded (![]() ). If you have selected a file containing a large number of
events the analysis may take a long time, in which case you can stop the analysis at any
point by pressing the Stop button (
). If you have selected a file containing a large number of
events the analysis may take a long time, in which case you can stop the analysis at any
point by pressing the Stop button (![]() ).
).
Once you have analyzed some events you can start browsing your histograms by double clicking on the histograms folder in the tree on the left side of the window. It is worth noticing that what has actually happened here is that your compiled analysis routine has been sent across the network to the data server, and used to process the data on the server, and as you click on the histograms they are bought back across the network and displayed locally. Using this approach you can analyze large datasets from any location with little overhead caused by the network.
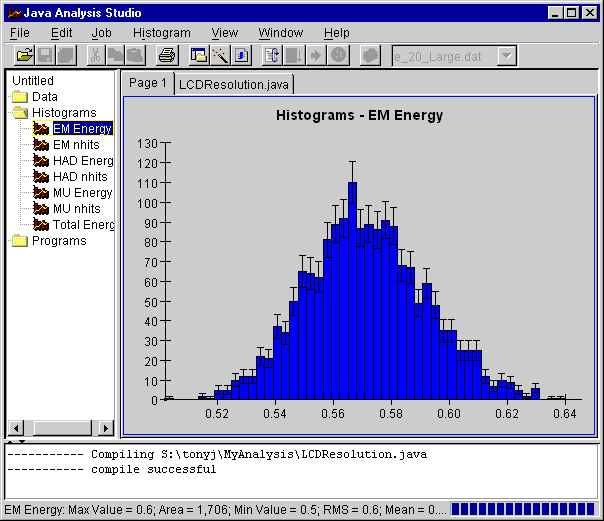
Java Analysis Studio supports many features for viewing and manipulating histograms, for example you can:

At this point you may well be thinking, "this is all very well, but what did all that code I had to cut and paste do, and how would I know how to change it to produce my own analysis code". All will be explained in the next tutorial.